It’s My Anniversary!

My husband and I are celebrating 13 years of marriage today! Well, we aren’t actually celebrating because he isn’t here, #militarylife. He’s on a trip and won’t be back until tomorrow. But that’s cool. We’ll see each other tomorrow and celebrate.

The last 2 days have been spent revamping the blog, yet again. I sat and went through every single post I’ve made since the beginning in 2012. It was time consuming but actually really awesome. I may not have blogged as often as I kept saying I wanted to, but I do have some pretty good ones in there and a lot of great projects I forgot about. It inspired me to get back into crafty blogging. Which is what this post is about.

Last year we celebrated 12 years of marriage and being the cheeseball that I am, I like to try to do traditional gifts. Let me rephrase… after our 10 year anniversary when I made a really super awesome gift encompassing 10 years worth of traditional gifts (that I really need to blog about because I never did), I decided to try to stick to traditional each year. 12 years is linens. I did not want to go out and buy new bedsheets or something, so I made my husband a quilt with old tshirts.

fb_img_1479834706837

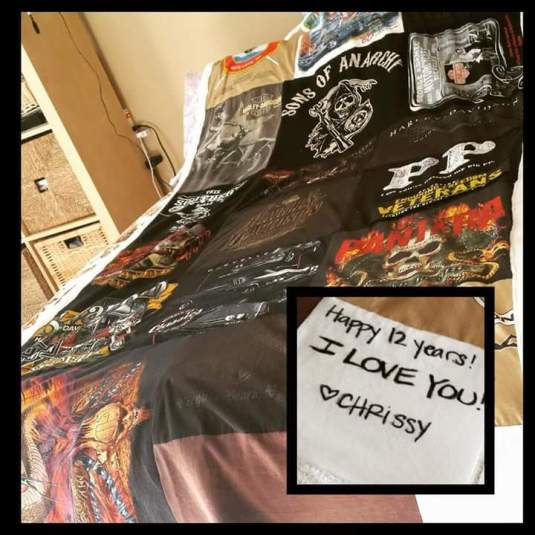
The bottom right corner is a white tshirt where I wrote a special message (pictured on the corner). Fun right?

Because we are a 1-car family and I didn’t really think about this gift ahead of time, I had to work with whatever I had in the house. I didn’t have felt or batting for the inside and I didn’t have enough tshirts for a backside, so I found an old blanket that we weren’t using. I cut it to size and used that as the backing. It worked out well. I only broke 2 sewing needles in the process of trying to sew the super thick edges. I think I remember having to hand-sew one or two of the edges because I ended up not having more sewing needles. Good times!! But it’s an awesome, and warm, blanket!

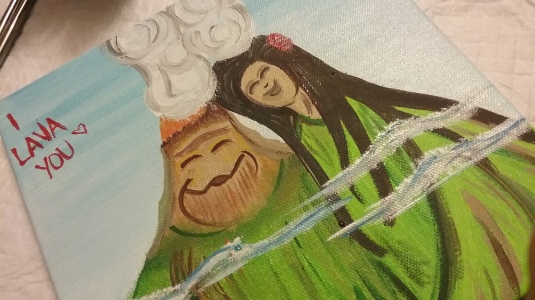
This year the traditional gift is lace. I am not buying my husband lace so I went nontraditional and painted him a picture. You guys have seen the Pixar short called Lava right? Go ahead, click the link and watch it real quick…..Super adorable right? Well, again, we are cheeseballs and totally love it so I painted it. But shhhhh….don’t tell him. I’ll give him the canvas tomorrow. 😉

20161120_165849

If you’re interested in seeing updates for my blogs on Facebook, give me a LIKE. I just made a new page yesterday. @thelifeofachrissy


Yoga & Art: When Passions Meet #NamasteTuesday

When we first moved here to Virginia, my husband wanted me to have my own space for yoga. He knew, before me really, how much it meant to me and how having my own space was going to make me happy. The house we moved in to was rather small but I had my own space. I had a section of our bedroom just for yoga. It was great. I decorated it how I wanted and it was MY space.

When we moved into the current house (we had to move because the owner of the first one wanted to move back in his house) I was going to have a craft/yoga room! Both of my passions inside one big room. Woohoo!!! Once I started unpacking and figuring out where everything was going to go I realized that my space was getting smaller and smaller. My husband said, “Why don’t you just have a craft room AND a yoga room?” Seriously, could I love him any more? Two rooms just for me? And that was the end of that and the beginning of the west side of the house being all for me.

When I first started practicing yoga I never thought it would become a passion and consume a lot of my life. Maybe I just needed my own room. I spend more time in this room than any other in the house. And it’s decorated with things that mean the most to me. Race paraphernalia, a poster of The Rock, and art.

20160920_144533

Along that far wall are all art pieces done by myself or my friends. Before I ditched cable I used to watch The Real Housewives of Beverly Hills. Yolanda had a wall of canvases in her house and each one was painted by someone in her family or friends. She even had a painting party when her daughter was moving so that she could make her her own wall. I fell in love with this idea. For my birthday in 2015 I had a painting party! I had my closest girlfriends over and we spent the day painting. Their paintings were my gifts (those are all the small ones). The top and bottom canvases were done at Wine Nights in Arizona, the ones where everyone drinks and paints the same picture. And then I have these…

fb_img_1474397402856

My daughter spent the summer in San Diego with my parents and I had a lot of free time. Since painting is my first passion, I thought I’d spend some time painting for me. I don’t usually do that. When thinking about what to paint of course my first thought was yoga. But what to do. I started by drawing an outline of someone doing Warrior 2. The ideas started flowing from there. I decided to look up the chakras and see which one coincided with that pose. Then I had to try more poses. I picked two more of my favorites; dancer and king cobra.

fb_img_1474397405476fb_img_1474397410390

While I was researching chakras I learned that wheel, also known as bridge, upward facing bow, or a backbend, is thought to align all 7 chakras. If you don’t know already, a basic backbend is by far my most favorite pose and learning it’s chakra alignment made me extremely excited. I searched around the craft room for more canvas and found a big one. SCORE! And then I needed a model.

screenshot_2016-09-20-14-49-11-1

Who better to model than myself? I’ve never done any sort of self-portrait work. This isn’t exactly a portrait, but it’s based on me and I think I did pretty good.

fb_img_1474397393323

*****************************

At the end of my last yoga blog I talked about my Instagram backbend challenges. I just finished a two-week long one and I am going to post about that next week! I had such a wonderful time.

But to finish this post, I’ll leave you with this photo. My bff, Isis, and I doing scorpion pose. This is part of a series we do that we call “long distance yoga bffs.”

photogrid_1474292785916

A Bit of Fabric and a Splash of Paint

I was pretty busy this last week. I finally sat down and did some stuff just for me; I did a couple projects I keep saying I’m going to and just haven’t got around to yet. Well, I got around to them, I finished them, and I am happy. That’s what important right?

Project numero uno… I have a friend who is about to become a daddy. His baby’s theme is Monsters Inc (soooo cute) so I made him a changing pad, wipe holder and some burp cloths.

10492493_10152626380676095_1032189080252474705_n

Isn’t the eyeball ribbon a super cute addition? I also found some fleece and had a piece cut for him to use as a blanket (not pictured). There are so many cute fabrics at Joann Fabrics right now, I could go insane. SEW ALL THE THINGS!!!

Sticking with the sewing theme, I finally finished my Day of the Dead quilt. I have SO much fabric in this theme. I make a point to always check for something new whenever I go to the fabric store. Plus, whenever my mom goes to the fabric store in San Diego she always checks their DOTD section there and grabs me something. So what to do with all this fabric? I can continue to make things for my kitchen like place mats and pot holders, or I can let the kitchen theme spill into other parts of the house. That sounds like more fun to me. But before I finished the quilt I decided to give some pillows a makeover.

I have two pillows that are old and kind of funky. You know, the stuffing is weird from being washed and they don’t have a great shape anymore. I decided that it was either the trash or a makeover. Makeover won and they look awesome.

DSC_0699

DSC_0704

Even Tony approves 🙂

And now for the quilt. This is my first time making a full-size, big enough to cover up with size quilt. It has a couple measuring flaws because I eyeball measure, but it’s still 100% pure awesomesauce. The front is big squares, a couple rows of smaller solid color squares, and the back is Loteria (Mexican Bingo) fabric. It’s big enough to cover the bottom part of my queen size bed. But I use it on the couch to cover up with when I’m snugglin’ with the hub and watching TV.

DSC_0706

DSC_0705

DSC_0707

Great right? I think so!! And I’ve never taken a class on quilting or anything.

When I finished my sewing projects I moved onto painting. My daughter’s school is getting a little makeover. The biggest part of the revamp is a new teachers lounge. New paint, new furniture and new cabinets. The principal wanted to make it a place where teachers may actually want to go and lounge, not just eat lunch and stare at the ugly walls. Sorry, but the school is old and has never been updated so yes, it was ugly in there. Anyway, since I am on the PTO now I decided to add my flair to the lounge. I wanted to put something on the walls that would just be a nice touch, something fun to look at. Off to Pinterest for ideas!! I searched “teacher quotes” and copied some ideas I found.

DSC_0708

This one has a side story. I was finished painting this one and then I immediately had to update my Facebook status. It said, “That moment you are painting something having to do with education and you misspell a word.” Yep, I was just so in the groove that I wasn’t paying attention and forgot the “N” in learning. Ugh! Instead of this one being white with blue letters, it turned out blue with white letters. Still cute.

DSC_0709

DSC_0710

I think the teachers will appreciate them.

The Mud Run and Then Some

It seems I always start blog posts out the same way…”I need to blog more.” But this time I am just going to forget that I suck at keeping up with these and get right to it.

Since my last post I have done a couple paintings that I would like to share first. The first one is Sea Filly, a seahorse from the HBO show, Rainbow Fish. She is my brother’s favorite character so I painted her on a canvas for his room.

1925283_10152426607436095_1825660106644505149_n

The next is one character some of you may be tired of seeing. I haven’t had enough of Frozen yet and neither had my daughter’s kindergarten teacher. She gave me an awesome gift (a replica Padres jersey) so I painted for her in return.

10426775_10152507004466095_3534067531437806725_n

I have a couple projects in the works right now. I am finally doing something with my day of the dead fabric I’ve been hoarding, lol. Every time I go to the fabric store I check to see if they have anything new even if I have never done anything with the fabric. So I am finally making a quilt. I have the whole squared top done and now I just have to put it all together with the batting and back. It’s coming along great; I just have to sit and finish it. I also have plans to make a quilt with some old Harley shirts my husband wants to save. I made some burp cloths last week and those are to go with a baby gift set I am making for an old friend who is about to become a daddy. His soon-to-be son’s room is going to be Monsters Inc theme and I just happened to find a couple different fabric options. Pretty awesome and soooo adorable!! So hopefully I’ll update with those sooner than all this.

Onto the Mud Run. Here‘s my recap of last years first if you want to read that first. Go ahead, I’ll wait. 😉
So this year was definitely harder. I run a ton more regularly than I did last year, but it was still tough. First off, they had a couple new obstacles or challenges. Dad and I ran together again and were off to an awesome start. 10312815_10152076529581176_2501760343150311849_n

We ran the first mile in just under 8 minutes. Then it happened. The first challenge. They had us do lunges for about 100 feet. And I didn’t half-ass those puppies either. But that was my mistake. I don’t do lunges normally so my legs were on fire the next 5 miles. So after that there is only one actual obstacle (the steeplechase) for the next 2ish miles. But those next 2 miles are an obstacle alone; hills. Nothing but uphill running. I heard someone say they call it the “Suicide Mile” or something really ominous like that. Well, I ran as much as could, walked some, but still made it the first 4 miles in about 44 minutes I think. Not terrible. Then the obstacles came. Tons of mud!! Fun of course, but remember those lunges? Oh yes, my legs sure did. Trudging through mud pits with sore thighs was no bueno. I slowed down a ton. Then we got to the slippery hill. Now this is not just a hill with mud and water coming down. This is a hill that is, no joke, straight up. Sprinklers are going and there are guys at the top with fire hoses. Saying it is slippery is an understatement. So of course the legs were giving out, so I told my dad I needed help. He grabbed my hand and pretty much pulled me up the hill while the guys at the top kept that fire hose pointed directly at me the ENTIRE time! Dad said, “No one left behind.” The guy responded with something like, “NO dry people allowed.” All I heard was, “I’m an asshole and I’m not going to stop spraying your daughter!” HAHA!! It’s all downhill running after that, maybe one or two more obstacles and then the home stretch. Here we are right before the last mud pit making a last effort to pass up those other runners.

10401867_10152076532511176_7989326771098227929_n

And then the mud pit. This year we literally had to swim through it.
10338774_10152076533881176_409291632644962458_n

And then we had to do pushups. I did girly ones.
10365978_10152076534576176_6134063328733181455_n

We finished in about 1 hour and 20 minutes. Last year we ran it in about 1 hour and 12 minutes. I had a mental goal to try to run it better than last year, but seriously, those lunges just set the tone for the entire race. But of course it was incredibly fun and I can’t wait for the next one.
1382013_10152076534871176_7440483051675452624_n

Actually, dad and I have both talked about trying a regular race, not one of these “fun” ones, to see our potential. But my dad can just shut his mouth because he ran the same race the next weekend and killed it of course. He finished it in 59 minutes, 33 seconds, 1st in his age group and 12th overall. You read that right, 12. Out of a couple thousand people. He’s a beast!

The best part of the Mud Run? Watching my daughter run the 1K Kids Run after we were done. She is so awesome!!
10393826_10152076536326176_504281187300293783_n
This was right after she blew her daddy a kiss.

10365948_10152076536971176_5388127443735645989_n
She looked so confused! So proud of that girl!!

Goals

Even though we are almost to the third month of the new year, I am setting some goals for myself in the crafting world. Numero one, blog once a week. It may seem easy but apparently, judging by the lack of post since late January, it’s hard for me. So here’s to sitting down at least once a week to write something. Someone told me that I could just post a photo and let that speak for itself, and some weeks I may do that, but I do love to write so we will see. Numero two, have at least one painting project per month. Painting is, after all, my favorite art. And when you see this most recent one you will see how much work I put into it. I love it. And so, I would LOVE to try to get a paying gig once a month. But if I don’t, I am going to try really, really hard to paint something for myself. Number three, take more pictures. This one may seem silly because I snap at least 5 pictures a day on my phone, so let me explain. I want to get my “good” camera out and take more photography-type pictures. I decided to the other day and look what happened.

DSC_0615
DSC_0628

I had some free “alone” time during the evening, the lighting was right, the desert flowers were in bloom, and I took frame-able photos.

And now I’m full circle, back to the more blogging part. I really need to keep this up because while I was scrolling through old photos on my camera, I saw that I never blogged about my anniversary gift for my husband. I also never blogged about my guest speaker thing I did. Grrr! Maybe a reminder would work. I don’t know. But here’s my most recent painting.

DSC_0640

A customer saw my My Little Pony painting and asked me to paint Draculaura from Monster High as a gift for her niece. She was so much fun to paint. A lot of work, but super fun.

Gwen’s Birthday and More

Let’s just get all this out of the way…

First, Happy New Year to everyone! I hope the first month of the year has been a great start for everyone. Second, I cannot, repeat CANNOT, believe that it’s been 3 months since I wrote a blog entry. I am so slacking. I have so much to talk about but I don’t want to put it all in one blog post so….

The title, Gwen’s Birthday. If you didn’t know, Gwen is my daughter and she just turned 6. Holy moley! Where did the time go? And you probably won’t believe what my sassy thing wanted for her 6th birthday; her ears pierced, for the second time. Of course she’s my child. I have mine pierced all the way up and have stretched ears. But when she asked me I about had a heart attack. After a good week of thinking it over my husband and I decided it was okay. But I wanted to give her something to unwrap at her party so of course I painted something for her.

DSCN2062

Rainbow Dash from My Little Pony, the Equestria Girl and the Pony. She LOVED it!! And now I have some of my art hanging in her room. It was also my first time that I signed the bottom of a piece with MOM rather than Chrissy.

So after I posted this on my Facebook page I got two requests for more painting! YEAH BUSINESS!! So next week I am going to be painting Draculaura (Monster High) and some other basic canvases (shapes, stripes, names) for a playroom. So exciting!!

Okay, the MORE part of the title. I have done a couple other projects since last year that I want to share in another post and I also want to post about my guest speaker thing I did with some Boy Scouts. So, I am going to finish doing some other important “wife and mom” things and get to those hopefully in the next couple days.

A Family of Sticks

A very long time ago, like 8 years ago, I made a plaque for some friends. I found some cute cartoon couples online and painted them along with a couple dogs onto a piece of wood. I actually forgot about painting it until a few months ago when that same friend asked me to do the same thing again for a friend of hers. I had her send me a photo the one I made for them and i started laughing. I could not believe what it looked like. It was cute, yes, but not even close to the things I paint now as far as, well, it looked like crap. LOL! Okay, not crap, it just wasn’t my best work. Of course that is the opinion of the artist and we are our own worst critics. ANYWAY, she wanted me to paint a new one and we came up with the idea for stick figures. You can actually do a lot with a simple stick figure. She asked me to do the little girl as a princess, the mom holding a new baby and the dad in ACU’s (Army uniform). So this is what happened.

252645_10151434782301095_743973758_n

Super adorable. The photo doesn’t do it justice, especially is the ACU’s. They came out super awesome. Right after I posted this to my Facebook page, TONS of people wanted one. Unfortunately I posted it right before I moved, so people had to wait. And wait they did. As soon as I was settled, I painted this one.

544911_10151609797211095_1675497347_n

Like I mentioned in one of my last posts (In a Nutshell), I paint these with as much detail as you like. Favorite colors, hobbies, or work attire. The dad’s uniform in this one is what they call Tiger Stripe pattern in the Air Force. I wasn’t sure if it looked right but when I showed my husband he said, “Whoa! That looks great. It looks just like it.” When my husband says it looks good, I know it does. Speaking of husbands, the wife (the girl that asked me to paint this) showed her husband and he was totally impressed and excited. Kudos for me when the husbands get excited over silly art projects.

Back to my friend whom I made one for many years ago…here’s their updated one.

DSCN1409

You guys know where to find me if you’re interested in one.

Mugstaches!!

I am finally sitting down and writing some blogs about the Christmas presents I made this year. I only bought one gift this year! The rest were totally handmade. I feel so awesome about that. I am going to write a couple different posts with different items, read ’em all or pick and choose, but I hope you like my art and maybe you can try some next year…or buy from me. That is always an option too. 🙂

First up, Mustache mugs.

2012-12-19_09-14-42_321

This one is for my husbands bff, Aaron. This one was super special made because he is left handed so I had to make sure it was on the right side when he held the cup.

2012-12-25_08-39-17_831

And then this one for my husband. (Yes, he is wearing a snuggie, or actually this one is called a Forever Lazy. It was a bday present from his bff ^)

These were super fun mugs to make. Here’s what I did:

If you’ve read my other blog post “Pin Pin Pinterest” you have seen that I experimented with drawing and painting on glass. The idea I saw on Pinterest for that stated that you could use Sharpee pens and cook the glassware in the oven and it would be permanent. Well…. this is what I learned from both projects. When you use a Sharpee on clear glassware, (I used wine glasses) it stays. I rubbed the heck out of the drawing and it wouldn’t come off. The only thing I noticed was that the yellow color burned off. No biggie. Since I had been successful with the glasses, I figured it would work just as well on the white mugs. After all, the original pin showed using white mugs and white plates. Perfect.

DSCN0969

This is what happened. The black Sharpee did not stay. So, I simply repainted the mugs with my paint specifically designed for glass, cooked them in the oven, and voila. Perfect. (The photo above is another mug I made for my husband that I have to go back and paint.)

I made another mug for my father-in-law. I used Sharpee on this one but I used color Sharpees.

IMG953807 (2)

Maybe it’s just something with the black, not sure. But once I cooked this one, I also rubbed the heck out of it and everything stayed put except the black. So I went back in with black paint and did like I did with the ‘stache mugs. Does anyone know what the symbol on this mug stands for? Maybe a free pair of earrings for the first person who gets it right!! 🙂 Just comment and guess.

But of course, there is something else you can’t forget with these……..hand wash only. No dishwasher. Hubster didn’t know that and this happened……

DSCN0968

At least I still have the outline. Maybe the Sharpee just needs to be cooked more than once. Ah well. Now I have something else to do.

Stay tuned for a few more posts about other gifts.
Happy New Year!!!

Dr. Seuss Project

I was sitting here for the last couple minutes trying to think of a clever title for this blog and for the life  of me I could not think of one. I think I need to go on a run after this to clear my mind. It is NOT normal for me to not be able to think of something cute and possibly rhyming. Maybe it was the lack of sleep last night since my sick husband was coughing and laying on top of my legs all night. Okay, that’s a whole other blog post. LOL. On to the main focus here, enough rambling.

A customer commissioned me to paint 4 Dr. Seuss themed canvases for her classroom. She told me she wanted one with Horton, Cat in the Hat, Thing 1 &2, and Yertle the Turtle. She sent me a picture of the fabric she was using as curtains so I could get an idea of the colors she wanted and I was off to find samples. I looked online, pinned a couple photos, she looked, she loved, I got started.

(Click the photos to see them bigger. Large just didn’t work out as well)

Here is the drawing of Yertle. All hand-drawn of course.

The Cat in the Hat.

I have photos of the other drawings but I just wanted to give you an idea of my progress so you just get these two. Onto the finale.

Thing 1 & Thing 2. So adorable

The Cat in the Hat

Horton. Don’t you just want to give him a giant hug? So cute.

I’m saving the best for last. There is something about this one that just blows my mind. And as I told my customer, “I don’t like to toot my own horn, but TOOT TOOT!!” Something about this one just makes it pop off the canvas and to me, it doesn’t look painted. It looks like a print. The pictures don’t even show the pure awesomeness. (Okay, enough boasting)

It seems like these projects keep getting more and more fun to do. Anything cartoon is just so fun. My customer came home late last night to her package on the couch. She text me late and said, “OH MY GOD THESE ARE SO MUCH BETTER IN PERSON!!!!” Yes, all caps. Love that reaction I get from people.

Stay tuned in the next week or two…I sent off the wedding project I did for a friend and she is going to give out the gifts this weekend. After that, I can post pictures. They turned out awesome.

Pin Pin Pinterest

First, if you are not doing Pinterest, you need to start. It is amazing! Especially if you are into arts and crafts because sometimes you have an idea but you just need a boost. Or more often, you didn’t know such ideas existed and usually they are awesome and you already have all the supplies. Anyway, I saw this yesterday and I love it.

It doesn’t describe me exactly because I have made a TON of stuff I’ve seen on there, but it still works because I think we are a small group…people that actually use Pinterest for ideas to use. So, I saw some cool things recently and like I said above, sometimes you already have all the supplies. I did! So here goes.

I love to paint. Duh. And I’ve tried painting on glass with just regular acrylic paint and it works, but it doesn’t stay on if you wash it. So I was on the lookout for glass paint. Found it! But while searching on Pinterest, I saw that you could draw on glass or ceramic with Sharpee markers and cook it and it would work the same. Um, that is way cool and super easy. So I did both, paint and Sharpee.

These are the Sharpee glasses before heading to the oven.

Here is the piece I painted. The left photo shows what it is. I got 3 of these in a pack for super cheap at Old Time Pottery. They are bottles used to preserve food but I am going to use mine for dish soap. (Why not?) I just took off the top metal and plastic pieces and painted it. I let this dry for about an hour (I did the next craft) and then it was off to the oven for all three pieces. Instructions for the Sharpee art were the same for the paint and were listed on the bottle of paint. Let dry and then cook at 350 for 30 minutes. But, you have to do it this way; put the pieces in the COOL oven. Then turn the oven on to 350. Start your timer when you start the oven so it’s 30 minutes total. Once the 30 minutes are over, turn the oven off and leave the stuff in there to let it cool. I took a nap for a bit so my stuff stayed in the oven most of the afternoon, but it was cool so it was okay. Took it out and….

Voila!!

I know what you’re thinking…they look exactly the same! I know! It’s great. They came out perfect!! I don’t have anything bad to say about the painted soap dispenser. But I have a few things to say about the Sharpee glasses. First, the yellow burned off. Second, you can see the pen strokes, but I think that just comes with using a Sharpee. And third, I love the way they came out, but I think it’s better to do this on white glass or ceramic, not clear. It looks cool, but in the picture, I put a napkin in each glass so you could see. Most blogs I have seen do the Sharpee thing for writing on mugs or keepsake plates for birthdays and parties. So just keep that in mind.

So while these were drying before the oven, I did another pinned craft.

Food coloring, glue, and a vase. What the heck am I going to do with those. Add a drop of food coloring to a cup with some glue, mix,  paint onto vase. What?!

You can see the streaks a bit but wait, it has to dry.

Oh my gosh! So cool!! A simple vase from a store-bought flower turned into an adorable sea glass sort of creation. I love it! And it was so simple.

Note: don’t move the vase with wet hands. 😉

Previous Older Entries